1. Introduction
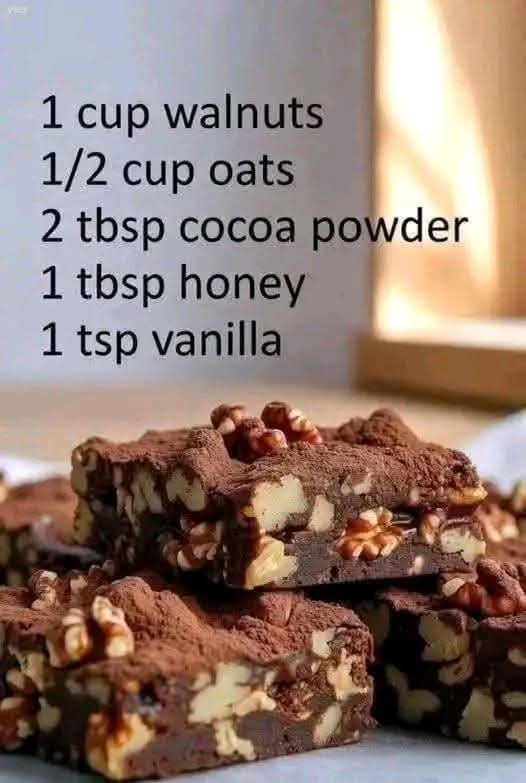
No-Bake Chocolate Walnut Brownies are delicious homemade treats made with simple ingredients, including walnuts, oats, cocoa powder, honey, and vanilla extract.
These little chocolate squares have a rich cocoa flavor, a chewy texture, and a satisfying crunch from the walnuts. Their natural sweetness comes from honey, making them a wonderful alternative to traditional brownies.
The best part is that they require no oven, no complicated preparation, and very little cooking experience.
They are perfect for breakfast snacks, afternoon treats, lunchboxes, or whenever you crave something chocolatey.
2. History and Background
Traditional brownies originated in the United States and became popular during the late 19th and early 20th centuries.
Originally, brownies were baked using chocolate, butter, flour, sugar, and eggs.
Over time, healthier variations appeared, incorporating ingredients such as nuts, oats, dates, honey, and natural cocoa powder.
No-bake brownies became especially popular because they are quick to prepare and do not require traditional baking ingredients.
This walnut and oat version is inspired by modern homemade energy snacks.
3. Ingredients
Preparation time: 10–15 minutes
Cooking time: None
Chilling time: 1–2 hours
Total time: Approximately 2 hours
Servings: 8–10 squares
Main ingredients
- 1 cup walnuts (approximately 100 g)
- 1/2 cup rolled oats (approximately 45 g)
- 2 tablespoons unsweetened cocoa powder
- 1 tablespoon honey
- 1 teaspoon vanilla extract
Optional ingredients
- 1–2 tablespoons water or milk, if needed
- 2 tablespoons chopped walnuts for extra crunch
- 1 tablespoon dark chocolate chips
- A pinch of sea salt
- 1 tablespoon melted dark chocolate for decoration
4. Equipment Needed
- Food processor or powerful blender
- Large mixing bowl
- Spatula
- Measuring cups and spoons
- Small square baking dish
- Baking paper
- Sharp knife
- Refrigerator
5. Preparation Instructions
Method 1: Preparing the walnuts
- Measure one cup of walnuts.
- Place them in a food processor.
- Pulse several times until they become finely chopped.
- Avoid blending for too long because walnuts can release their natural oils and turn into walnut butter.
- Reserve a small amount of chopped walnuts for the final mixture if you prefer a crunchier texture.
Method 2: Preparing the oats
- Measure half a cup of rolled oats.
- Add them to the food processor.
- Blend until they become a coarse flour.
- Transfer the ground oats into a mixing bowl.
Method 3: Combining the dry ingredients
- Add the ground walnuts to the oats.
- Add two tablespoons of cocoa powder.
- Add a small pinch of salt.
- Mix everything thoroughly.
- Make sure the cocoa powder is evenly distributed.
Method 4: Adding the natural sweetener
- Add one tablespoon of honey.
- Add one teaspoon of vanilla extract.
- Mix the ingredients using a spatula.
- Continue mixing until the mixture begins to stick together.
- If the mixture is too dry, add water one teaspoon at a time.
- Mix until a thick, moldable dough forms.
Method 5: Forming the brownie mixture
- Line a small square baking dish with baking paper.
- Transfer the chocolate walnut mixture into the dish.
- Spread it evenly across the bottom.
- Press firmly using the back of a spoon or spatula.
- Make sure the surface is smooth and compact.
- Sprinkle the reserved chopped walnuts over the top.
Method 6: Chilling the brownies
- Cover the baking dish.
- Place it in the refrigerator.
- Chill for approximately 1–2 hours.
- Allow the mixture to become firm enough to cut.
- Remove the dish from the refrigerator.
Method 7: Cutting and serving
- Lift the mixture out of the dish using the baking paper.
- Place it on a clean cutting board.
- Cut into equal-sized squares.
- Sprinkle additional cocoa powder on top if desired.
- Add a few walnut pieces for decoration.
- Serve immediately or keep refrigerated.
6. Preparation Methods and Techniques
This recipe uses several simple preparation techniques:
- Grinding: Walnuts and oats are processed into smaller particles.
- Mixing: Combines the dry ingredients with honey and vanilla.
- Binding: Honey helps hold the ingredients together.
- Pressing: Compresses the mixture into a firm brownie shape.
- Chilling: Allows the mixture to become compact and easier to slice.
Unlike traditional brownies, this recipe does not require eggs, butter, or oven baking.
7. Formation and Final Appearance
The finished brownies should have:
- A rich dark chocolate color.
- A compact and chewy texture.
- Visible walnut pieces.
- A slightly crunchy exterior.
- A naturally sweet chocolate flavor.
The walnuts provide richness and crunch, while the oats help create structure and the honey acts as a natural binder.
8. Serving Suggestions and Chocolate Lovers
These delicious chocolate walnut squares can be enjoyed in several ways:
- With a cup of coffee.
- Alongside hot tea.
- With fresh strawberries.
- With banana slices.
- With plain Greek yogurt.
- With a little peanut butter.
- With melted dark chocolate drizzled on top.
For an extra indulgent dessert, serve a brownie square with a small scoop of vanilla ice cream.
They are especially appreciated by lovers of chocolate desserts, nuts, homemade energy snacks, and no-bake treats.
9. Nutritional Information
Approximate nutritional values per square, assuming 10 servings:
| Nutrient | Amount |
|---|---|
| Calories | 105–120 kcal |
| Protein | 2.5–3 g |
| Carbohydrates | 8–10 g |
| Fat | 7–9 g |
| Fiber | 1.5–2 g |
| Sugar | 2–3 g |
Values are estimates and depend on the size of the squares and the ingredients used.
10. Tips for Perfect Results
- Use fresh walnuts for the best flavor.
- Avoid overprocessing the walnuts.
- Use unsweetened cocoa powder for a rich chocolate taste.
- Add honey gradually to control the sweetness.
- Add water little by little if the mixture is too dry.
- Press the mixture firmly into the baking dish.
- Refrigerate long enough to achieve a firm texture.
- Use a sharp knife to create clean brownie squares.
- Add chopped walnuts on top for extra crunch.
- Use dark cocoa powder for a deeper chocolate flavor.
11. Storage and Preservation
Refrigeration: Store the brownies in an airtight container in the refrigerator for up to 7 days.
Freezing: Place individual squares between sheets of baking paper and freeze for up to 2 months for best quality.
Thawing: Allow frozen squares to thaw in the refrigerator or at room temperature for a short period before serving.
Serving: These brownies are delicious when chilled and slightly firm.
12. Conclusion
No-Bake Chocolate Walnut Brownies are a simple and delicious homemade treat that combines the rich flavor of cocoa with the natural crunch of walnuts and the sweetness of honey.
Their easy preparation, minimal ingredients, and chewy texture make them a wonderful alternative to traditional baked brownies.
Whether enjoyed as an afternoon snack, a quick breakfast treat, or a small chocolate dessert, these little squares are guaranteed to satisfy chocolate cravings.
Rich chocolate flavor, crunchy walnuts, chewy texture, and no oven required – a little homemade treat worth making again and again!